Waterproofing Standards for Bathrooms and Wet Areas
A bathroom can look beautiful on the surface while hiding problems underneath. Water that escapes through poorly protected junctions, penetrations or floors can damage surrounding building materials long before a visible leak appears.
That is why waterproofing standards matter. They help establish how wet areas should manage water and protect the building, from the shower floor to the junctions behind the tiles.
For homeowners, builders and renovators, understanding the basics also makes buying construction products easier. A waterproofing membrane is important, but it needs to work with the substrate, primer, sealants, drainage details and tile adhesive.
This guide explains the Australian approach to bathroom and wet-area waterproofing, what to consider when choosing products, and which details deserve attention before the finished surfaces go on.
What Are Waterproofing Standards?
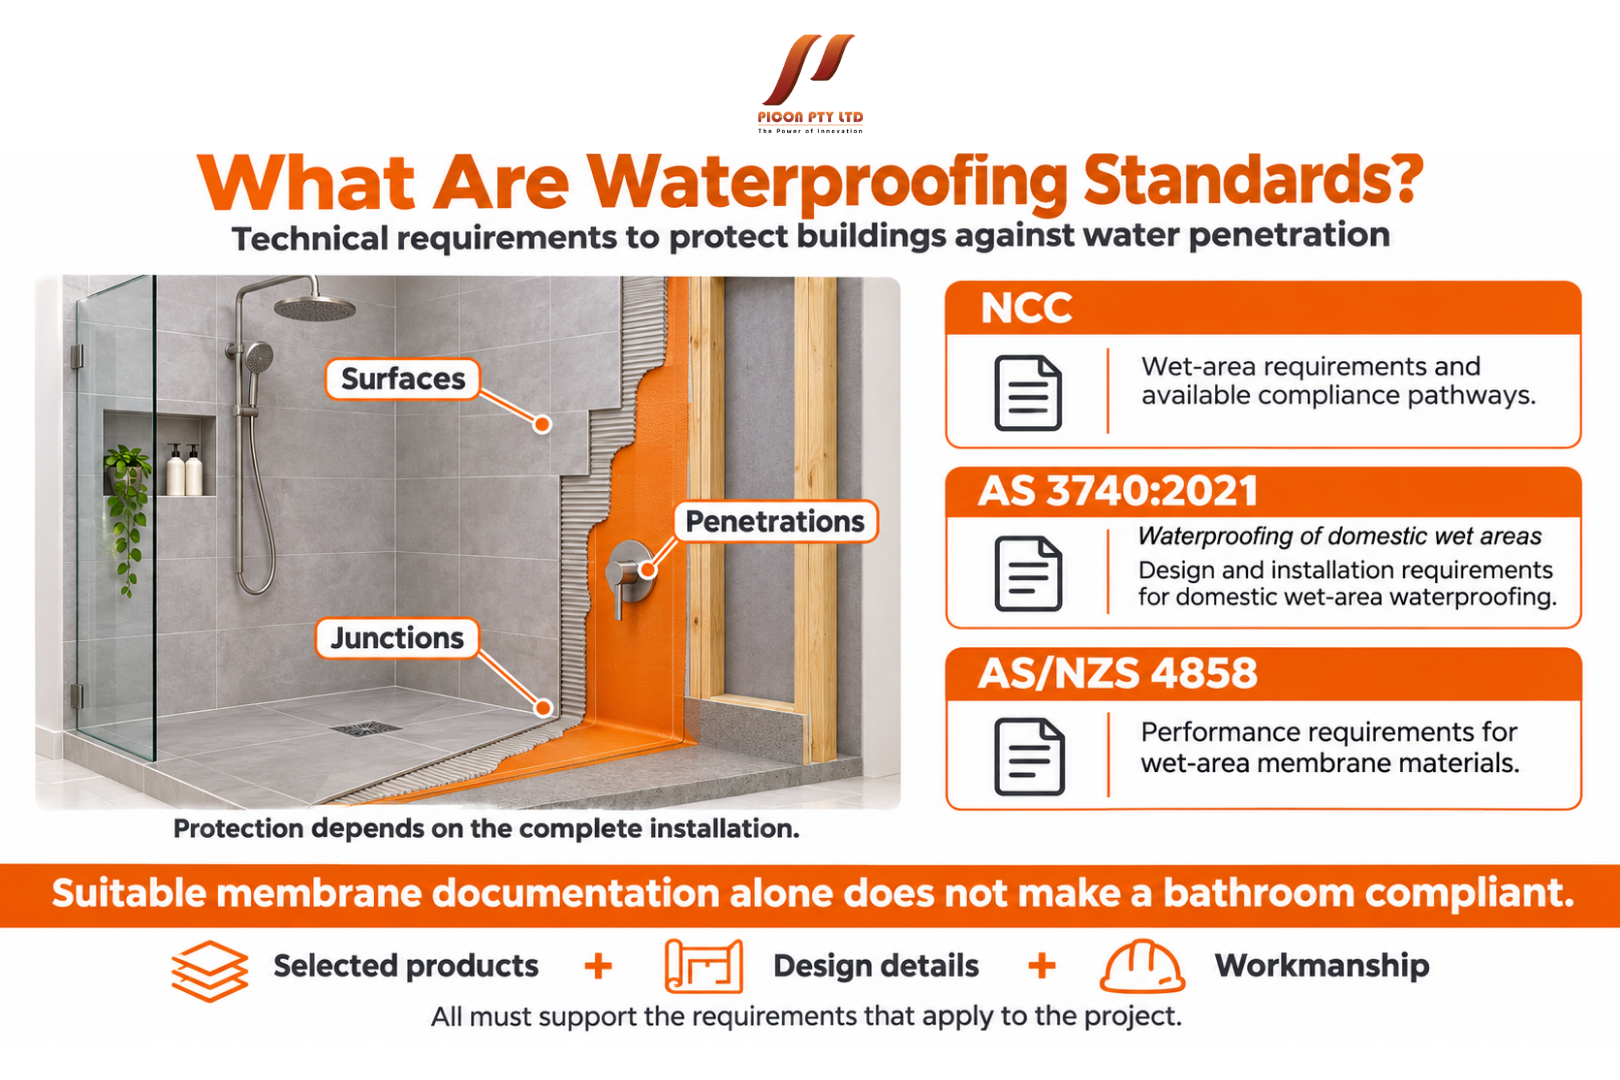
Waterproofing standards set out technical requirements for designing and installing systems that protect buildings against water penetration. In bathrooms and other internal wet areas, they address how different surfaces, junctions and building elements should be protected.
In Australia, AS 3740:2021, Waterproofing of domestic wet areas, is a key reference. The National Construction Code, or NCC, also establishes wet-area requirements and the available compliance pathways. AS/NZS 4858 addresses wet-area membrane materials. These documents have different roles: installation requirements and membrane performance are related, but they are not interchangeable.
The practical point is that compliance involves the complete installation. Buying a membrane with suitable supporting documentation does not, by itself, make the bathroom compliant.
The selected products, design details and workmanship all need to support the requirements that apply to the project.
Which Waterproofing Standards Apply to Your Project?
Start by confirming the applicable NCC edition, building classification and state or territory requirements. The newest published code is not necessarily the edition governing every project.
Adoption dates and transitional arrangements can differ. For example, the NSW Government states that NSW will adopt NCC 2025 on 1 May 2027, while Queensland has also announced a delayed start of 1 May 2027. This makes project-specific confirmation important, particularly during a transition between editions.
There can also be more than one compliance pathway. For Class 1 buildings under the NCC 2022 provisions described by Victoria’s Building and Plumbing Commission, the Deemed-to-Satisfy arrangements allow specified Housing Provisions requirements together with either the referenced AS 3740 pathway or the detailed Housing Provisions pathway.
For a customer ordering materials, this means the waterproofing specification should be settled before the shopping list. Your builder, designer, waterproofing contractor or building surveyor can help establish the appropriate requirements.
Waterproofing Standards: Waterproof Versus Water-Resistant
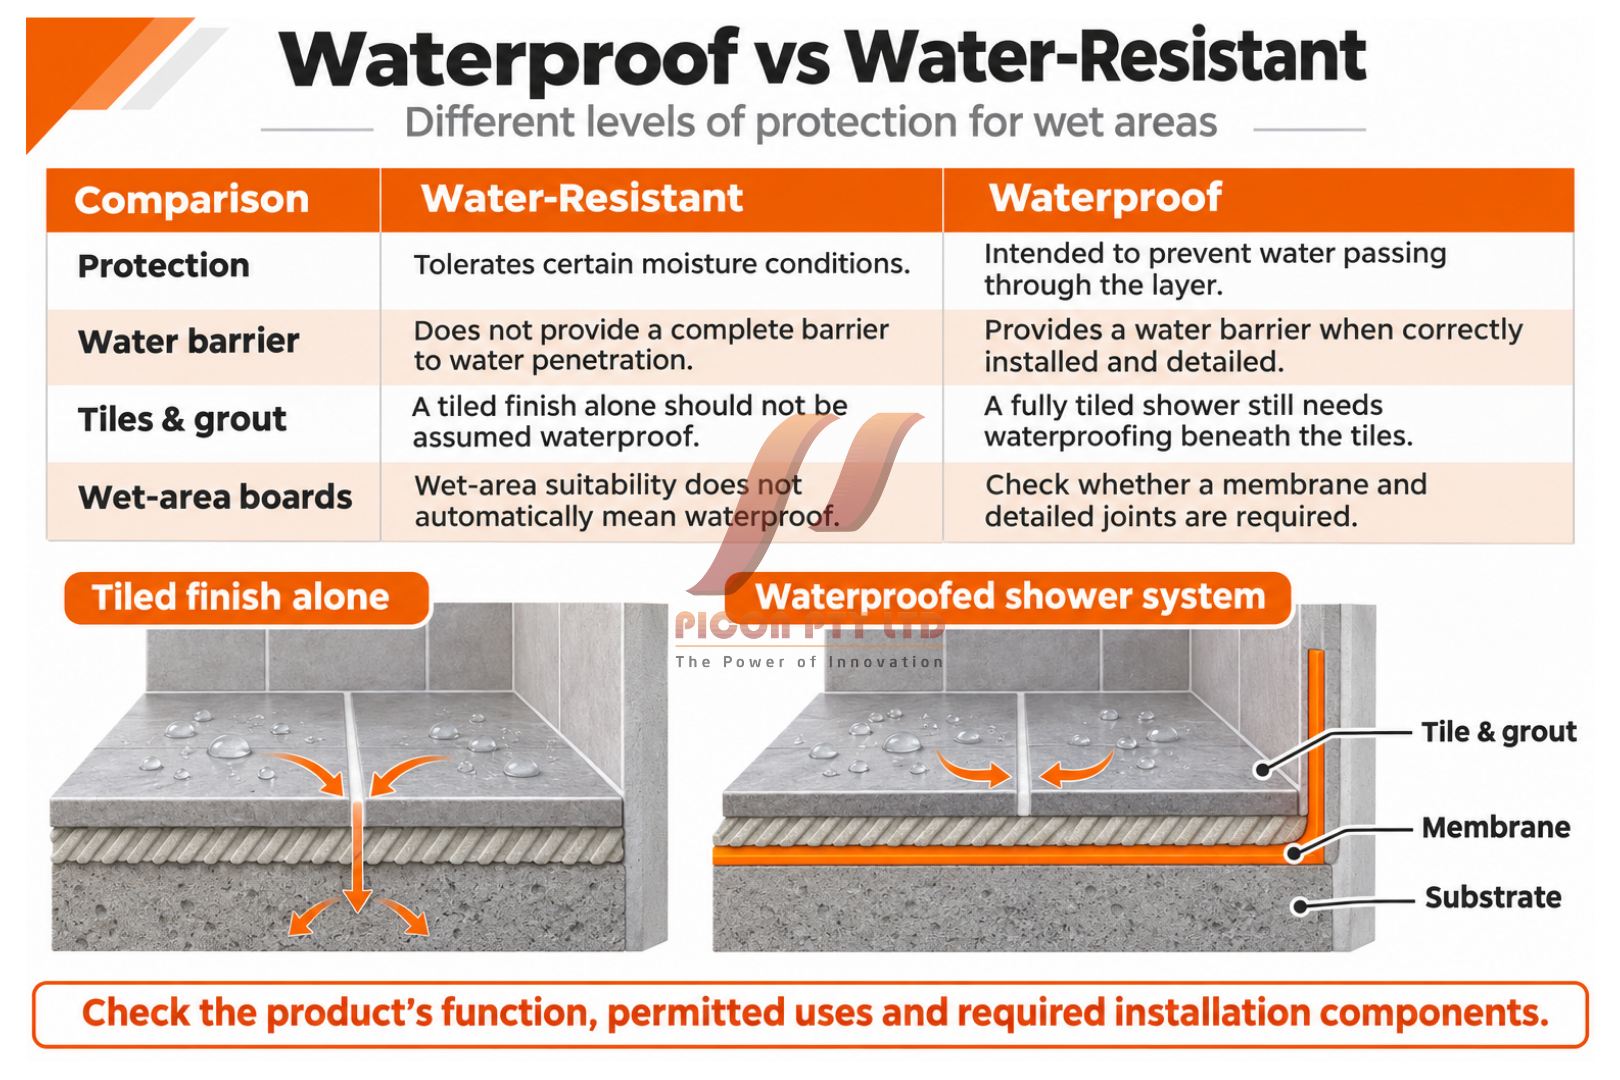
“Waterproof” and “water-resistant” may sound similar, but they describe different levels of protection.
A water-resistant material can tolerate certain moisture conditions without providing a complete barrier against water penetration. A waterproof layer is intended to prevent water passing through it.
This distinction explains why a tiled surface should not automatically be treated as waterproof. Tiles, grout joints and their surrounding details form part of a finished system, and water can reach the layers beneath. Siniat’s wet-area guidance specifically explains that a fully tiled shower still needs waterproofing underneath the tiles.
The same care applies to product descriptions. A board described as suitable for wet areas does not automatically remove the need for a membrane or correctly detailed joints.
When comparing products, look beyond a general “wet-area suitable” label. Check what the product does, where it can be used and what additional components its installation requires.
Where Bathrooms and Wet Areas Need Protection
A bathroom does not experience the same level of water exposure everywhere. A shower floor receives direct water regularly, while other surfaces may mainly encounter splashes or occasional moisture.
The required protection depends on the location, shower arrangement, floor construction and applicable compliance pathway. Shower floors, surrounding walls, junctions and penetrations all need careful consideration.
Open showers deserve particular attention because water is less contained. An attractive walk-in design can change the area that needs protection beyond the space immediately around the shower outlet.
Baths with showers above them also require coordinated detailing. The bath edge, adjacent walls and any screen arrangement influence how water is managed.
For that reason, avoid assuming that a single height or distance applies to every bathroom. The waterproofing layout should follow the actual design and the project’s requirements, including niches, ledges, doorways and other features that interrupt otherwise simple surfaces.
Choosing Products That Support Waterproofing Standards
A useful way to approach product selection is to think in systems rather than individual containers.
The membrane needs to suit the substrate and intended application. Its primer, joint treatment, sealants and tile adhesive must also be compatible with it.
Manufacturer instructions help identify these relationships. For example, Dunlop’s waterproofing guidance specifies preparation and priming steps and identifies adhesives suitable for use over its membrane. That information is more useful than assuming any primer or adhesive will work with any waterproofing product.
Before buying, check the technical data sheet for approved substrates, application conditions, coverage, thickness and curing requirements. Also confirm how corners, penetrations and drainage connections should be detailed.
If products from different manufacturers are proposed, seek confirmation of compatibility. Similar colour, chemistry or marketing language is not sufficient evidence that two products will perform together.
A clear, documented system also makes it easier to calculate quantities and avoid last-minute substitutions.
Why Surface Preparation Matters
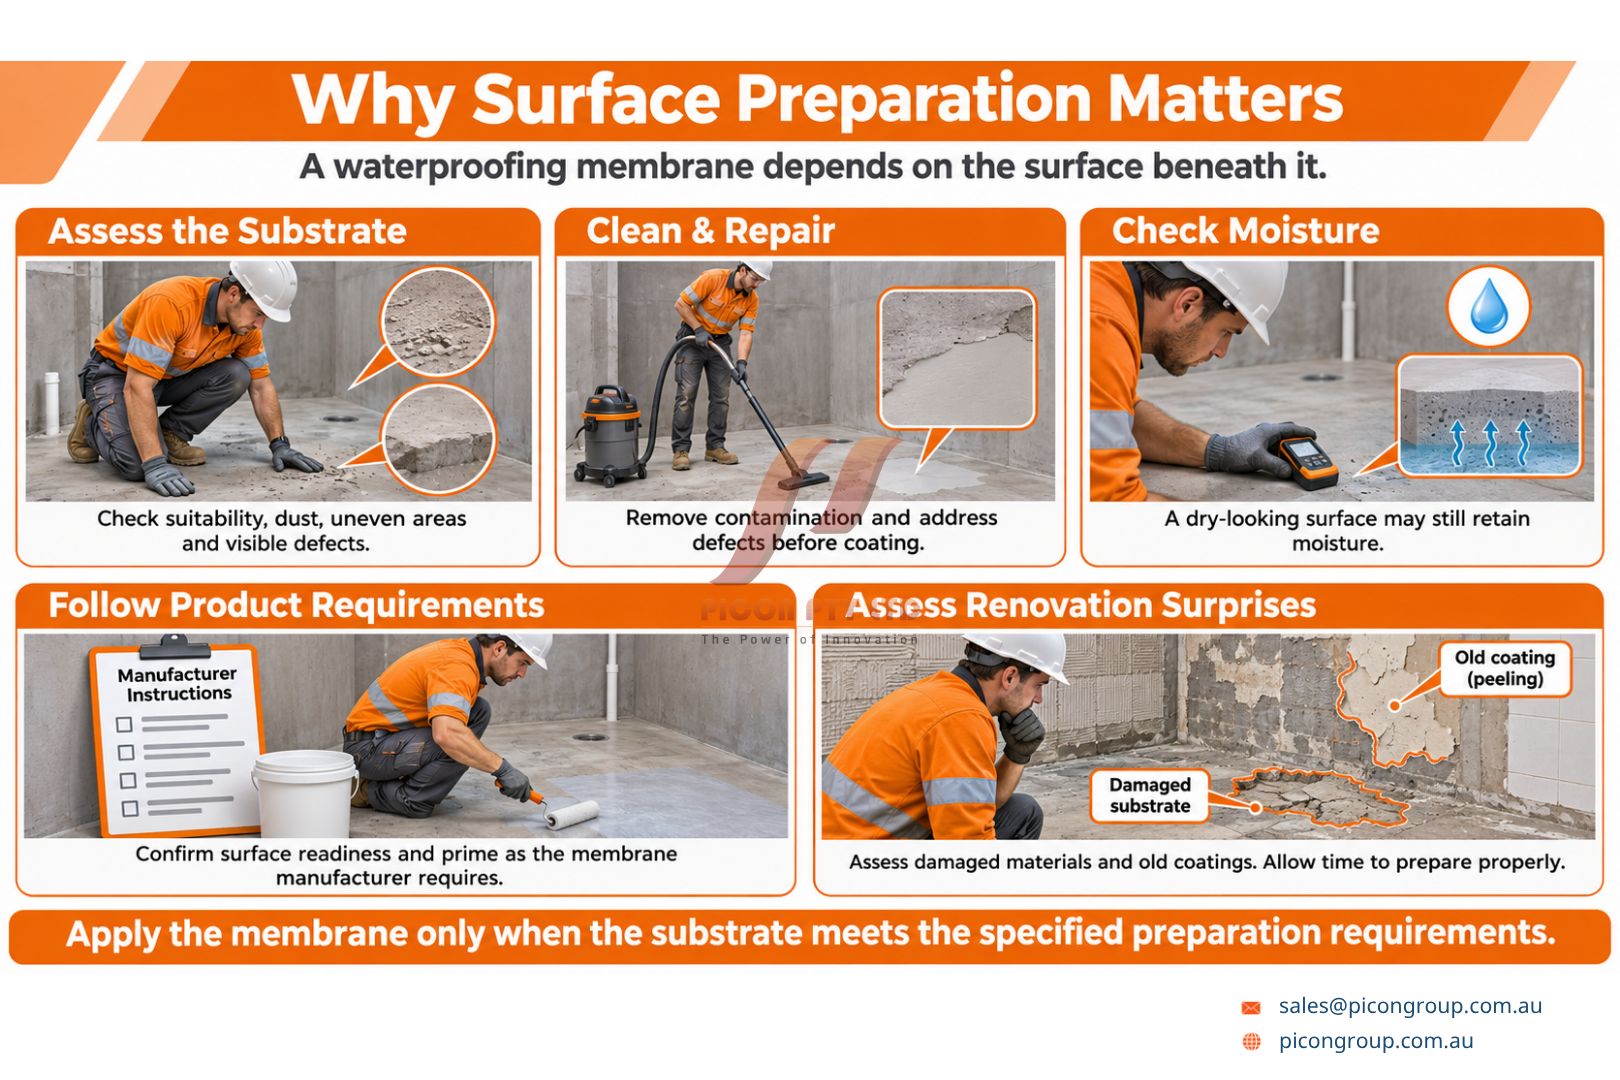
A membrane relies on the surface beneath it. If that surface is dusty, unsuitable, uneven or excessively damp, applying a quality product may still produce an unreliable result.
Preparation should therefore happen before anyone starts coating. The installer needs to assess the substrate, address defects and follow the membrane manufacturer’s requirements for readiness and priming.
Moisture is especially important. A surface may appear dry while retaining moisture that affects adhesion or curing. The Building and Plumbing Commission highlights substrate moisture checks and the need for clean, smooth surfaces as part of correct membrane application.
For renovation projects, preparation may involve more work than expected once old finishes are removed. Damaged materials or unsuitable previous coatings should be assessed rather than concealed beneath a new waterproofing layer.
Allowing time for this stage helps prevent the installation programme from pressuring the contractor to coat a surface before it is ready.
Corners, Penetrations and Drainage Details
Flat areas are only part of a bathroom’s waterproofing challenge. Changes of direction and interruptions in the surface need equally careful detailing.
Wall-to-floor junctions, internal corners, pipe penetrations and floor wastes all create places where the waterproof barrier must remain continuous.
A bond breaker is used in relevant membrane systems to help accommodate movement at a junction rather than forcing the membrane to remain tightly bonded across it. Its material and configuration need to match the specified system.
Drain connections also need a planned detail. The membrane must integrate correctly with the appropriate drainage component; coating around a visible opening is not enough to establish a reliable connection.
Doorways and shower boundaries require similar coordination. Their details should manage water without creating an unintended route into neighbouring rooms.
These are useful areas to discuss before installation, particularly when choosing floor wastes, shower screens or a flush-entry bathroom layout.
Drainage and Waterproofing Need to Work Together
Waterproofing helps prevent water entering vulnerable building elements. Drainage helps move water to the intended outlet. A successful bathroom needs both.
A membrane cannot compensate for an unsuitable floor arrangement, and a well-positioned drain cannot protect gaps in the waterproofing system.
Falls should be considered early enough to coordinate floor levels, screeds, thresholds and selected finishes. Large tiles and linear drains can influence how the floor is constructed, so these decisions should be discussed before waterproofing begins.
The membrane’s position within the floor build-up also matters. The designer and installer need to coordinate the layers so water is managed as intended.
For product buyers, this means the floor waste should be selected as part of the wet-area system. Appearance matters, but so do its installation details and compatibility with the proposed construction.
Membrane Thickness and Curing: Why “Two Coats” Is Not Enough
For liquid-applied membranes, the finished coating thickness matters. Simply recording that two coats were applied does not confirm that the required thickness was achieved.
Western Australia’s Building and Energy inspection report highlights this issue, noting that applicators should follow the membrane manufacturer’s wet-film and dry-film thickness requirements. It also records considerable variation between products, reinforcing why one general thickness rule should not be applied to every membrane.
Coverage calculations can help with purchasing, but they need to reflect the specified application. Stretching a container over a larger area than intended can leave insufficient material on the surface.
Curing needs the same attention. Recoat time, readiness for tiling and full cure are separate milestones. ARDEX’s WPM 002 product information, for example, lists different times for each and states the environmental conditions on which those figures are based.
Plan the work around the selected product’s requirements rather than a generic next-day schedule.
Checking the Waterproofing Before Tiling
Once tiles are installed, much of the waterproofing becomes difficult to inspect. A planned check before covering the membrane is therefore valuable.
The installer should verify that the specified areas are covered and that junctions, penetrations, drainage connections and terminations are complete. The surface should also be checked for visible defects or damage.
Any required inspection or testing should follow the project specification, applicable requirements and manufacturer instructions. Where a water test is specified, its timing must account for the membrane’s required cure.
Keep useful records while the work is visible. Product details, photographs, application records and relevant inspection documents can help explain what was installed and where.
The membrane also needs protection after inspection. Follow-on work should be coordinated so tools, foot traffic or fixings do not damage the completed layer before tiling.
Buying Wet-Area Products with Greater Confidence
Before placing an order, establish the bathroom layout, substrate types, waterproofing extent and proposed system.
Ask your supplier for current technical documentation and confirm that the required accessories are available. A membrane order may also need primer, joint-treatment materials, compatible sealants and appropriate drainage components.
Quantity estimates should account for the actual treated area, vertical surfaces, detailing and the manufacturer’s specified coverage. Buying only enough for the bathroom’s floor footprint can overlook substantial parts of the installation.
It is also worth confirming the tile adhesive before work begins. Compatibility should be resolved while choosing the system, rather than left until the tiler arrives.
With a coordinated specification and the right products, purchasing becomes more straightforward—and the installer has a clearer basis for completing the work.
Building a Bathroom That Performs Beneath the Surface
Waterproofing standards help turn a collection of bathroom products into a coordinated approach to water protection.
The most reliable starting point is to confirm the project requirements, choose a compatible system and allow enough time for preparation, detailing, curing and inspection.
Whether you are renovating one bathroom or supplying materials for several wet areas, discuss the complete installation with your contractor and construction products supplier. The details hidden beneath the tiles deserve just as much attention as the finishes you see every day.
At Picon, we support residential, commercial and prefabricated construction projects with structural steel, insulation, roofing, cladding, doors and frames, and other essential building materials. Our team works with builders, developers and project professionals to help identify products suited to modern Australian construction requirements.
Whether you are building a new home, townhouse development, apartment project or renovation, Picon can help you explore reliable material solutions designed for durability, performance and efficient construction.
Contact Picon to discuss your building material requirements and find practical solutions for your next project.